Wednesday, December 12, 2012

Sooji Ka Halwa (Semolina Halwa)

I am blogging like after 3 months. Lot of happenings. Left Chennai shifted to Mumbai and now finally settled here.
Its the onset of winters. u dont have much of a winter here in Mumbai but I guess the feeling of it does not go, So I made this Sooji ka Halwa quiet common in all the households.... The best part of having this halwa is straight from the pan, when it done and its burning hottt....!!
Sooji ka Halwa

Ingredients:
1 cup Sooji (Semolina)
1/2 cup Ghee
1 cup Sugar
4 cups of Water
1tsp Cardamom powder
Raisins and almonds and Cashewnuts


Procedure:

  • Heat ghee in a pan, add in sooji.
  • Roast it on medium flame stirring continuously till it turns golden in colour.
  • In the meanwhile, in another vessel make a sugar syrup with sugar + water + cardamom powder.
  • The sugar syrup needs to be of one thread consistency.
  • When the sooji is roasted well, add in the sugar syrup, stirring continuously
  • Add in the nuts
  • Serve hot


Friday, August 10, 2012

Punjabi Kadhi Chawal

Celebrating the spirit of Punjabism with on the day of Rakshabandhan with this awesome combination of Kadhi Chawal, Its tangy, spicy and mouthwatering with the aroma of curry leaves.
This is one is a favourite in my family especially my brother.
There are many ways and style of cooking kadhi, like u have the Sindhi kadhi with vegetbales, Gujrati and Rajhastani Kadhi is a bit sweeter with addition of jaggery or sugar.
 My Grandmom always used to tell me that The word kadhi comes from "Kadhna" which means cooking on low flame till the kadhi becomes 1/2 its quantity and gains all flavour.
This is secret of a tasty kadhi.

Punjabi Kadhi Chawal


Ingredients:
1tbsp Chickpea flour or Besan
1/2 kg Curd
2 cups of Water
1tsp Turmeric Powder
For the tempering:
2tbsp oil
1tsp Mustard seeds
7-8Curry Leaves
2 Whole Red Chilies
1 medium sized Onion (julienned)
2 Green Chilies
1tsp Ginger Paste
Fresh Coriander

For the Pakodas
2tbsp Chickpea Flour (Besan)
Salt to taste
1tsp Cumin Powder
1tsp Coriander Powder
1/2tsp Red Chilly Powder
Water to make a paste
Oil to fry

Procedure:
For the Kadhi:

  • Take a bowl add in whisk the curd in it.
  • Add in besan mix well, so that no lumps are made
  • Now add in 2 cups of water. Mix well.
  • Add in Turmeric Powder.
  • Take a handi or kadhai, heat oil in it.
  • Add in mustard seeds + curry leaves + whole red chilies.
  • Add in onions + green chilies + ginger paste.
  • Let them saute on low flame.
  • After 10 minutes add in the curd mixture.
  • Add in salt.
  • After one boil, let it simmer on low flame.
  • The more time the more tastier the kadhi is.
  • Keep stirring it so that it does not stick at the bottom.
  • In the meanwhile prepare the pakodas.
  • Mix all the ingredients.
  • Make a paste.
  • Heat oil, fry small size pakodas.
  • After 30 minutes add in the pakodas in the kadhi
  • Add in chopped coriander.
  • Let it simmer on low flame for another 30-45 minutes,
  • Stirring continuously.
  • Check the seasoning.If required add in salt + red chilly powder + cumin powder.
  • Punjabi Kadhi Chawal
  • Serve hot with boiled rice onions and green chilly

Monday, July 23, 2012

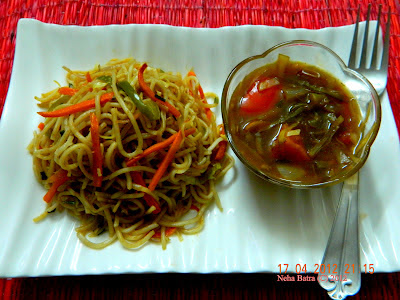
Stir Fried vegetable noodles with stir fried vegetbales

Its Chinese again...!!1 It been a long time since I have made these at home, but not posted  it.  One of the  quickest meal one can make on a lazy day when you don't want to indulge in something too laborious to make.
So here is the penultimate dish in the Chinese cuisine The stir fried noodles with some veggies stir fried too.
It tastes great when accompanied by some gravy dish like Manchurian or may be Paneer Chilly. I was wee bit tired to make any of these things so i quickly chopped the vegetables, added in stock, and some sauces and my accompaniment was ready.
Stir-fried noodles with stir fried Vegetables..!!

Ingredients:
For the Noodles:
2 packet Veg Hakka Noodles (I used Chings)
Water to boil
Salt to taste
1 + 1tbsp Olive oil
1 Capsicum (thinly sliced)
1 Carrot (thinly sliced or shredded)
1 Red or Yellow Bell Pepper (thinly sliced) (optional)
6-7 cloves of Garlic
2 Green Chilies (thinly sliced)
1 cup Cabbage (shredded)
1/2 cup Spring Onions (chopped)
1 large Onion (thinly sliced)
2tbsp Soya Sauce
1tbsp Vinegar
2tbsp Red chilly Sauce

For stir fried vegetables:
1 medium sized Onion (Cubed)
1 Red Bell Pepper
1 Capsicum
6-7 cloves of Garlic
1 Carrot
2 cup Vegetable Stock
2tbsp Soya sauce
1tsp Vinegar
2tbsp Red Chilly Sauce
Salt to taste
1tsp White Pepper powder
2tbsp Olive oil

Procedure:
For the stir-fried noodles:

  • Boil water in a vessel add in salt + oil.
  • Add in noodles only when the water starts boiling.
  • The noodles would  take from 8-10 minutes to be cooked.
  • Do not overcook as it wont taste great. 
  • Remove them from water.
  • Heat oil in a wok, add in chopped garlic
  • When its done add in onions.
  • When the onions turns translucent, add in carrots.
  • After 5 minutes add in capsicum.
  • Then add in cabbage + spring onions.
  • Mix them all well. 
  • Make sure that the vegetables are not over cooked. it has to be semi cooked to maintain the crunchiness of the same.
  • Add in all the sauces.
  • Mix well.
  • Add in the boiled noodles.
  • Stir fry on high flame.
  • Cook for 2-3 minutes.
  • Switch off the flame.
For the stir-fried vegetables:
  • Take a wok add in oil
  • Add in chopped garlics.
  • Add in onions. Cook till it becomes translucent.
  • Add in carrots, just cook for 2 minutes
  • Add in  capsicum + bell peppers + spring onions.
  • Mix all these well.
  • Add in vegetable stock and all the sauces.\
  • Add in salt + white pepper powder.
  • Mix well.
  • Let it boil. lower the flame 
  • Cook for 10 minutes.
  • Close the flame.
  • Serve hot with the noodles alongwith a glass of wine. 


Stir-fried noodles with stir fried Vegetables..!!

Wednesday, July 18, 2012

Vegetable Spring Rolls with Chilly garlic sauce & Fried noodles

Its time for something really Chinese and the best appetizer dish to make and post on my blog.. Spring rolls`!!!
Since a long time I wanted to try these at home, as I really love them a lot. So finally the day came and made them
The best thing about them is that its not messy to eat, pick it and pop it into the mouth. Hassle free eating.

Vegetable Spring Rolls


Ingredients:
For the Wrappers:
200gms Maida
2tbsp Cornflour
Salt to taste
1egg (optional)
Water to make a batter of flowing consistency just like you make that of a Dosa

For the Filling:
1 Onion (thinly sliced)
1/2 cup spring onions(chopped)
1cup Cabbage (shredded)
1Carrot (shredded)
1 Capsicum ( thinly sliced)
1cup mixed Yellow and Red Bell Pepper
1/2 cup Beans (shredded)
7-8 cloves of Garlic
2tbsp Soy sauce
2tbsp Red Chilly sauce
Salt to taste
Black Pepper to taste
2tbsp Oil to cook the vegetables
Oil to fry the spring rolls
Pinch of ajinomoto

Procedure:

  • Take a bowl, add in maida+ corn starch+ salt .
  • If using egg then beat the egg in a separate bowl.
  • Mix in the maida.
  • Add in water to make into a flowing consistency.
  • Heat a pan, take a spatula full of the batter.
  • With the help of the spatula, spread it just the way you do it for dosa.
  • It should be thin.
  • When one side is cooked, flip it over to cook on the other side.
  • Repeat the same with the remaining batter.
  • Keep it aside.
  • When it cools down. Start making the spring rolls.
For the filling:
  • Heat oil in a wok, add in garlic. 
  • Then add in onions, after it turns pink, add in carrots.
  • Cook till gets tender, then add in the beans.
  • Let it cook for five minutes.
  • Add in cabbage + capsicum + bell peppers. let it saute on low flame for 5 minutes.
  • In the end add in the spring onions.
  • Add in soya sauce+ red chilly sauce + pinch of ajinomoto + salt+ black pepper + white pepper.
  • Mix well.
  • Remove from flame.
  • Do not overcook the vegetables.
To make the spring rolls:

  • Make a paste of cornflour for sticking the sides of the spring roll.
  • This time I was a wee bit lazy so got the ready made wrappers from the market.
  • Defrost the sheets before making them into spring rolls.
  • Now spread One sheet.
  • Put 1tbsp full of the mixture on a corner of the sheet.

  • Now fold it towards inside. as seen in the picture

  • Now forld the corners inside as seen in the picture

  • Fold it again.

  • Stick the ends with cornflour paste.
  • Repeat the same with rest of the sheets.
  • Heat oil to fry.
  • Fry them on low flame.


Red Chilly Sauce:
Ingredients:
6  Dry Red chilies
4 cloves of garlic
1tbsp soya sauce
2tsp brown sugar
1tsp vinegar
Salt to taste
1cup hot water
Sesame Oil/ olive oil whichever is available

Procedure:
  • Break the red chilies and soak them in hot water.
  • Drain the water out from the red chilies.
  • Blend it in the mixer.
  • Heat oil in pan, add in finely chopped garlic into it.
  • Add in soya sauce+ vinegar + brown sugar + salt.
  • Switch off the gas pour this over the red chilies.
  • Mix well. 
  • Serve with the spring rolls.
Fried noodles:

  • Boil about 100gms of noodles.
  • Deep fry them in hot oil.
  • Strain and serve.


Vegetable Spring Rolls with Chilly garlic sauce & Fried noodles


Tuesday, July 10, 2012

Baileys Irish Cream

I once had this drink at my friends place and from that day I just got carried away by this one.. I guess the best  drink  one can have. Buying this drink in India becomes little difficult, so I decided to find out a solution to this. Before sharing the recipe let me tell you what exactly a Baileys Irish Cream is. Its an Irish whisky and cream based liqueur.  It can be drunk all by itself or it can be added to deserts, coffee, cocktails and so on and so forth.
The flavour is so captivating that you just cant go with one. The recipe is so simple and all the ingredients are easily stocked in your homes always...
As its an Irish drink so you need to have Irish whisky but I used Chivas tat also tastes great.

Baileys Irish Cream 

Ingredients:
1cup Fresh Cream
400ml Condensed milk
1 1/2 cup Whisky (any preferably Irish but I used Chivas Regal)
1/2 cup Dark Rum
1tsp Instant Coffee
1tsp Vanilla Extract
2tsp Chocolate Syrup


Procedure:
  • Combine all ingredients together and blend it in a blender.
  • Bottle in a tightly sealed bottle. 
  • Refrigerate it.
  • Can be stored for 2 months.


Friday, July 6, 2012

Coconut Ladoo

Living in the state which is surrounded by coconuts everywhere, made me try out this awesome little ladoos made with coconut and Milkmaid.
Its simple and really easy to make.
Coconut Ladoos


Ingredients:
1 tin Milkmaid
100g Milk Powder (Dairy Whitener)
5 cups Fresh Coconut (Grated)
1cup Dry coconut (Desiccated Coconut)
1tsp Cardamom Powder
Few Muffin Cups

Procedure:
Coconut Ladoos
  • Take a thick bottomed kadahi or pan, add in grated fresh coconut + condensed milk + Milk powder.
  • Add in cardamom powder.
  • Heat the mixture, stirring continuously, so that it does not stick to the bottom of the pan.
  • Lower the flame, and cook till the mixture starts leaving the sides of the pan.
  • Remove from fire, and let it cool down.
  • When it is cooled, roll into ladoo.
  • Roll it in the dry coconut.
  • Place it individually into the muffin liners.
  • Store in a air tight container.
Shelf life: 3-4 days
Makes around 20 ladoos


Thursday, June 28, 2012

Honey & Butterscotch Muffin


Its raining crazily here in Chennai... A cup of hot coffee accompanied with the purrrfect combination of honey & butterscotch makes it a magical evening.

Honey & Butterscotch Muffin


Ingredients:
250gms Self-raising flour

1tsp Baking Powder

1/2tsp Salt

125gms Butter (salted or unsalted)

175ml Milk

1tsp Vanilla Essence

2 Eggs

1cup Honey
1cup Butterscotch Chips


Tips:

ü  If using Salted Butter then don’t add in the salt in the batter.


ü  If self raising flour is not available, increase the quantity of baking powder to 3tsp.


Procedure:

·         Pre-heat the oven for 15 minutes at 180 degrees Celsius

·         Grease the muffin moulds with butter.

·         Place the muffin liners into the moulds.

·         Take two bowls, one for dry ingredients and the other for wet.

·         In one bowl, sift flour + baking powder.


·         In another bowl add in melted butter + milk + vanilla essence + eggs +honey.

·         Whip it all together for 5-8 minutes.

·         Now slowly add in the dry mixture into the wet folding it gently together.


·         With the help of an ice-cream scoop or a spatula fill in the moulds with the batter just 3/4th of the mould.

·         Place the moulds into the oven for 15minutes at 180 degrees Celsius.

·         Check them with the help of a tooth pick it it’s done.

·         If it’s done take it out from the oven.

·         Demould it after 5 minutes

        
Indulge!!!


Tuesday, June 26, 2012

Chocolate & Banana Muffin


A sumptuous Buffet laid out out for breakfast in a five star hotel and all that I lay my hands are on the varities of muffins kept.
The first thing that I always pick and relish and enjoy till the end.
So today I am posting one of the varieties a combination of Chocolate and Banana which are both healthy and tastes great too. 


Chocolate & Banana Muffin


Ingredients:

250gms Self-raising flour

50gms Brown Sugar

125gms Castor Sugar

1tsp Baking Powder

1/2tsp Salt

125gms Butter (salted or unsalted)

175ml Milk

1tsp Vanilla Essence

2 Eggs

2 Ripe Bananas

100gms Chocolate Chips


Tips:


ü  If using Salted Butter then don’t add in the salt in the batter.


ü  You can add only castor sugar in the batter which means 175 gms of castor sugar.

ü  If self raising flour is not available, increase the quantity of baking powder to 3tsp.


Procedure:


·         Pre-heat the oven for 15 minutes at 180 degrees Celsius

·         Grease the muffin moulds with butter.

·         Place the muffin liners into the moulds.

·         Mash the bananas with the help of a fork.

·         Take two bowls, one for dry ingredients and the other for wet.

·         In one bowl, sift flour + baking powder.

·         Add in Sugar. Mix well.

·         In another bowl add in melted butter + milk + vanilla essence + eggs.

·         Whip it all together for 5-8 minutes.

·         Now slowly add in the dry mixture into the wet folding it gently together. 

·         Add in the mashed bananas and chocolate chip into the batter.

·         With the help of an ice-cream scoop or a spatula fill in the moulds with the batter just 3/4th of the mould.

·         Place the moulds into the oven for 15minutes at 180 degrees Celsius.

·         Check them with the help of a tooth pick it it’s done.

·         If it’s done take it out from the oven.

·         Demould it after 5 minutes.

·         Serve.

Blueberry Muffin


Oh, do you know the muffin man,
The muffin man, the muffin man;
Do you know the muffin man,
Who lives in Drury Lane?

Oh, yes, I know the muffin man,
the muffin man, the muffin man,
Yes, I know the muffin man,
Who lives in Drury Lane

The nursery rhyme which we all must have sang in our childhood. While making a batch of these wonderful bread (Muffin) these lines came to mind? 
When I was a child I would have not even thought of actually making these. 
I tried these out with blueberries which has a great nutritional value. Its rich in manganese and helps in 
reducing cholestrol too.

Blueberry Muffin 


Recipe: Yields 12


Ingredients:


250gms Self-raising flour

50gms Brown Sugar

125gms Castor Sugar

1tsp Baking Powder

1/2tsp Salt

125gms Butter (salted or unsalted)

175ml Milk

1tsp Vanilla Essence

2 Eggs

200gms Blueberry (Fresh or frozen or canned)


Tips:

ü  If using Salted Butter then don’t add in the salt in the batter.

ü  You can add only castor sugar in the batter which means 175 gms of castor sugar.

ü  If self raising flour is not available, increase the quantity of baking powder to 3tsp.


Procedure:

·         Pre-heat the oven for 15 minutes at 180 degrees Celsius

·         Grease the muffin moulds with butter.

·         Place the muffin liners into the moulds.

·         Take two bowls, one for dry ingredients and the other for wet.

·         In one bowl, sift flour + baking powder.

·         Add in Sugar. Mix well.

·         In another bowl add in melted butter + milk + vanilla essence + eggs.

·         Whip it all together for 5-8 minutes.

·         Now slowly add in the dry mixture into the wet folding it gently together.

·         Add in the blueberries in it.

·         With the help of an ice-cream scoop or a spatula fill in the moulds with the batter just 3/4th of the mould.

·         Place the moulds into the oven for 15minutes at 180 degrees Celsius.

·         Check them with the help of a tooth pick it it’s done.

·         If it’s done take it out from the oven.

·         Demould it after 5 minutes.

·         Serve.


Tuesday, June 12, 2012

Watermelon & Rose Water Sorbet


During this time when holidays are planned, summer camps are organized, relatives are visited and all open spaces become playgrounds supporting a roaring multitude obsessed with the gentleman’s game, the need for an easy to make, refreshing, healthy and economical thirst quencher is universally felt. Thought there are a thousand homemade heat-beaters suggested by parents and elders ranging from the mundane to the exotic. Of all these one of the most effective is the ubiquitous and simple Sorbet or Italian Ice. It makes the perfect desert when the temperature rises.

Watermelon & Rose Water Sorbet

Mark Twain once commented “When one has tasted watermelon, he know what the angels eat” So surely watermelon is the fruit of the angel. I used this fruit alongwith the Rose water which gives a very refreshing flavour.


Ingredients:
3cups Watermelon pieces (deseeded)
3tbsp simple syrup
2tbsp milk powder
Juice of 1 lemon
2tbsp rose water
Few rose petals for garnishing


Procedure:
  • ·         Chop the watermelon, deseed it .
  • ·         Put into the food processor along with lime juice + milk powder + rose water.
  • ·         Churn it till it forms a smooth mixture.
  • ·         Now place it in a baking dish.
  • ·         Fold in the simple syrup into it.
  • ·         Place it in the freezer overnight.
  • ·         If u a have an ice cream maker then next day just churn it in the maker according to the manufactures instructions.
  • ·         In case you don’t have one, then next day take it out from the refrigerator, churn it again in the food processor.
  • ·         Keep it back in the freezer.
  • ·         Repeat this after 1-1/2 hrs.
  • ·         You can use a fork or an electric beater.
  • ·         Sorbet will be ready in next 8 hrs.
  • ·         Before serving place the glasses in the freezer.
  • ·         Scoop the sorbet and put it in the glasses
  • ·         Garnish with rose petals and watermelon slices.
  • ·         Serve chilled.