Showing posts with label Cakes and Puddings... Show all posts

Tuesday, October 7, 2014

Pound Cake

Baking insect has bit for a while now. These days my house only smell of vanilla essence, sugar, and everything related to baking.
A classic pound cake has always been my all time favourite. Its simple and tastes great when eaten with evening tea or coffee and a great breakfast option too when served with whipped cream and fresh fruits.

Pound Cake


Ingredients:
3 Large eggs
3tbsp Milk at Room temperature
1tsp Vanilla Essence
1tsp baking powder
150gms  Castor Sugar (White)
150gms All Purpose Flour
185gms Butter

Procedure:

  • Pre-heat the oven for 15 minutes at 180degrees.
  • Line the cake mould with parchment paper.
  • Whisk together Milk + eggs + Vanilla essence
  • In another bowl mix together all the dry ingredients, All Purpose Flour  + Baking Powder.
  • Now mix in half of the wet ingredients into the dry mixture on low speed. 
  • Add in the remaining mixture. Whisk it for 30 seconds so that everything comes together properly.
  • Pour the batter into the mould and smooth en the top with a spatula or a palette knife.
  • Bake in for 40 -45 minutes or till the tooth pick comes out clean.
  • If the top starts browning cover it with aluminium foil.
  • When its done remove it From the oven
  • De mould and place it on a wire rack.
  • Allow it to cool.
I served the Pound Cake with homemade orange sauce.

How to make orange sauce:
Take 100ml of orange juice fresh or canned
2tbsp sugar
Pound Cake
Take a pan reduce the juice and sugar mixture till it becomes thick.
It should be of flowing consistency just like any sauce.
D`2Wrizzle on top of the cake
Serve

Sunday, June 1, 2014

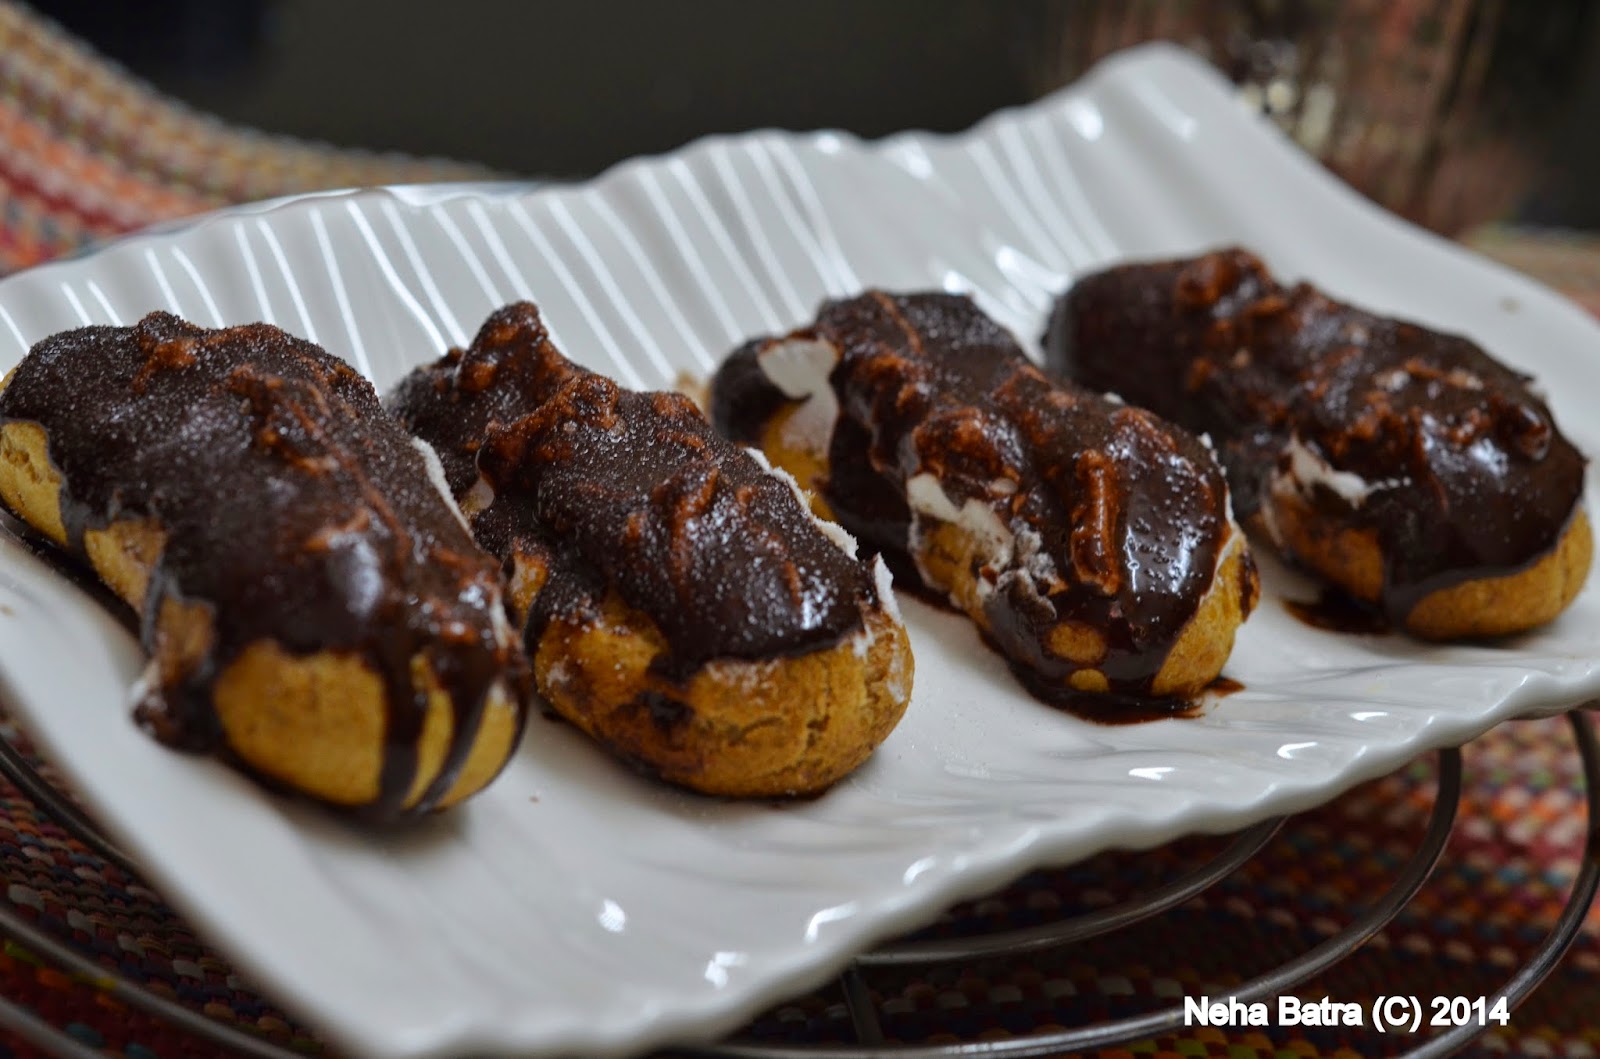
Chocolate Eclairs

Baking has become my passion lately, just want to experiment with new things. But still there is a long way to go.
But cooking or baking in this case is really challenging when u have a little one at home who just wants to play with u all the time and not sleep.
Nevertheless I keep pushing myself more and more.
I was seeing this food food channel where chef Shipra Khana made these awesome eclairs, which tempted

me then and there to try them out.
I checked my pantry, and hurrah!! I had all the stuff available.
so next step was to START.
I mad my little one sit in his bouncer, played some music and i was all set o bake this awesome delight.

Ingredients:
65gms Flour (maida)
1tbsp granulated sugar
55gms butter
120ml water
2 eggs

For topping
Whipped cream with vanilla extract

Chocolate Ganache

Procedure:

  • Pre-heat the oven at 200degree Celsius.
  • Place a parchment paper on the baking tray.
  • You can also use aluminium foil, brush it with butter. This is equally good as using a parchment paper.
  • In a bowl whisk the flour with sugar.
  • In a pan heat water and butter together.
  • Close the flame add in the flour into it.
  • Whisking regularly.
  • Cook it till it starts  sticking to the pan.
  • Remove from flame.
  • Beat the mixture till it becomes lukewarm.
  • Then add in the lightly beaten eggs.
  • Continue to mix till the batter is a thick paste.
  • Put the mixture in a pastry bag with a large pin.


  • pipe the mixture in oblong shapes on the baking tray.

  • Bake for 15 minutes at 200dregress and reduce it to 180 degrees.
  • Continue to bake for another 25 minutes.
  • Remove from oven and place it on a the wire rack
Assembling the eclairs:
  • Slit open the elcairs lentghwise.
  • Dip top part of the eclair into the chocolate Ganache.
  • Fill the bottom half with whipped cream
  • Place the other half on top of it.
  • Chocolate Eclares are ready to be eaten. :)


Thursday, September 5, 2013

Strawberry Swiss Roll

I remember learning these super delicious Swiss rolls in my first bakery lessons around 6 years back. I was super excited to bake this then, as the way a sponge cake sheet is rolled with fillings of your choice.
I have tried this many times before, but finally created the best possible Swiss roll.
I hope my readers will enjoy this.
Strawberry Swiss Roll


Ingredients:
For sponge Cake:
2 Eggs
50gm Sugar (Grained)
50gm Flour
1 tsp Baking Powder
Salt (a pinch)
30ml Water
1tsbp Vanilla Essence

For the Strawberry Filling:
As it is not season of strawberries, I used strawberry syrup. You can use strawberry jam too.

Whipped Cream
Strawberry Syrup or Jam
Sugar Syrup to moisten the sponge sheet.

Procedure:

  • Preheat the oven at 225 degree Celsius.
  • Line a cake tray with butter in which you need to make the sponge sheet.
  • Sieve Flour and baking powder together.
  • Whip eggs and sugar for 5 minutes with help of an electric blender till it turns fluffy and moo use like.
  • Add all the other ingredients (sugar + flour+ baking powder+ Vanilla Essence).
  • Beat the mixture till it becomes smooth and fluffy. ( Do not over mix the batter)
  • Fold in water with the batter very lightly
  • Pour the batter into the greased tray and bake it for 15 minutes or till it becomes brown from the top.
  • Keep checking it from time to time.

For the Filling:
250 ml whipping cream
Food color (Pink) (a pinch)
1tbsp Icing Sugar
Strawberry Syrup (I used Mapro)


Procedure:
  • Take 250 ml of any whipping cream.
  • Whip the cream with the help of a beater. Make sure the cream is cold
  • Add the pink color and the strawberry syrup.
  • Fold it in.
  • The filling is ready to be used in the roll. 
For assembling the rolls:
Strawberry Swiss Roll
  •     Remove the sponge from the tray once it is cooled down.
  •     Place the sponge over a butter paper.
  •     Moist the sponge with sugar syrup. (You can add strawberry essence in the syrup if u want to)
  •     Apply the whipped cream with a palate knife.
  •     Spread it all over smoothly.
  •     Now roll the sponge alongwith the butter paper with light hands.
  •     Seal it from both ends. 
  •     Keep it in the freezer for 30 minutes so that it sets and cutting the Swiss rolls becomes easier.
  •     After 30 minutes remove the butter paper.
  •     With the help of a pallate knife do the icing of the Swiss roll with the remaining cream.
  •     Cut into slices and serve.


n
f


Monday, August 19, 2013

Marble Cake

Being pregnant makes you indulge in all that is rich in calories. I had this terrible craving of eating a freshly baked homemade cake. And nothing better than eating a cake which has a blend of both vanilla and chocolate flavours.
Its the best alternative, if you  cannot decide on to what flavour you want to have in cake. The cake is rich in its flavours, buttery and moist.
Normally it is baked in a bundt pan, but due to its unavailability, I baked it in a normal round baking dish.
If u have it then go for it.
Marble Cake


Inspired by : Joy of Baking Website

Ingredients:
295gms Plain Flour (Maida)
170gms Butter (Salted or Unsalted) at Room Temperature
250gms Castor Sugar
3 Large eggs
2tsp Vanilla Extract
2tsp Baking Powder
1/4tsp Baking Soda
120ml Milk

For the chocolate batter:
140gms of Semisweet Dark Chocolate

1 Baking Dish
Butter or non stick spray for lining the pan

Procedure:
  • Pre-heat the oven at 180 degree Celsius for 20 minutes.
  • Butter the pan in which you need to bake the cake.
  • Melt the chocolate in a heatproof bowl using the double boiler method or simply heat it in a microwave for 30 seconds to 1 minute.
  • In a separate bowl mix all the dry ingredients together (Flour + Baking Powder + Baking Soda)
  • Now, with the help of a hand blender beat the butter until smooth.
  • You can even use your hand to cream the butter. I prefer using hand and blender both
  • Now add eggs one at a time, make sure it does not cuddle up.
  • After the eggs alternately add the maida and the milk.
  • Keep stirring slowly.
  • Now divide the mixture into two portions. Depending on to which portion you want more, vanilla or chocolate.
  • Now in one portion mix in the melted chocolate.
  • Place the batters into the Pan which u have prepared alternating with vanilla and chocolate batters.
  • In the end with help of a knife or a fork draw light swirl to give the marble effect.
  • Place it inside the oven.
  • Bake it for about 35-40 minutes or till the toothpick comes out  clean when inserted.
  • Remove from oven and place it over a wire rack till it cools down completely.
  • De-pan it.
  • Dust it with icing sugar or cocoa powder.
Slice of Marble Cake
Tips:
  • While baking when u see the color starts to appear, cover the cake with a sheet of aluminium foil, so tat it does not become too dark.
  • Marble cake is the best accompaniment with evening tea or coffee.

Thursday, January 31, 2013

Chocolate Chip Cupcake with Chocolate Ganache


Yet another Day, yet another craving for cupcakes and this time it is Chocolate.  Read somewhere:

“All you need is love. But a little chocolate now and then doesn't hurt.” 
― Charles M. Schulza


So all the chocolate lovers gear up for this weekend and try these yummilicious cupcakes with loads of chocolate.

Chocolate Chip Cupcake with Chocolate Ganache


Ingredients:
110 gms Flour
110 gms Castor Sugar
110 gms Butter
1/4 tsp Baking Powder
30 ml Milk
2 Eggs
1 tsp Vanilla Extract


Procedure:

  • ·         Pre-heat the oven at 180 degrees for 10 minutes.
  • ·         In a bowl, add the flour, baking powder and keep aside.
  • ·         Put the butter and sugar in a bowl.
  • ·         Cream with beater till light and pale.
  • ·         Add the eggs one at a time. Beat well.
  • ·         Add in vanilla extract.
  • ·         Gradually add in the flour, seeing that no lumps are formed.
  • ·         Add in milk.
  • ·         Mix it well.
  • ·         Do not over beat the batter.
  • ·         Pour the batter in greased and lined muffin tray.
  • ·         Bake for 15-20  minutes at 160 degrees.

F       For the Icing:

     Chocolate Ganache

    Ingredients:
    100 gms Chocolate
     50  ml Cream

     Procedure:

  •     Melt the chocolate on a double boiler or you can do it in the microwave also.
  •     For 30sec-1minute microwave it in the oven.
  •     Fold in cream.
  •    Whisk together to combine.
  •     Put it in piping bag/spread it over the cupcakes.
  •     After spreading the ganache, top it with whipped cream
  •     I added yellow color, in the whipped cream you can choose any of the colors.
  •     Decorate with sprinkles.

  • Chocolate Chip Cupcake with Chocolate Ganache

I


Wednesday, January 30, 2013

Red Velvet Cupcakes with Cream Cheese Frosting


I am posting another awesome flavour of cupcakes. As February is approaching, Red Velvet Cupcakes  are ideal for the month of love decorated with hearts and other sprinkles.
Hoping u all will enjoy these beastly creatures a lot.
Red Velvet Cupcakes with Cream Cheese Frosting


Ingredients:

125gms Flour
125gms Castor Sugar
50gms Butter
15gms Cocoa Powder
1tsp Vanilla Extract
1tsp Baking Powder
1/4tsp Baking Soda
1 Egg
Few drops Red Color
85ml Buttermilk
Few Drops of Vinegar

Procedure:

·          Pre-heat the oven at 180 degrees for 10 minutes.
·          In a bowl, mix the flour, cocoa powder, baking powder and baking soda.
·          In another bowl cream butter and sugar till pale.
·          Add the egg beat well.
·          Then gradually add in the flour mixture.
·          Finally add the color, buttermilk and vinegar.
·          Pour the batter into the lined and grease muffin moulds.
·          Bake in an oven for 15-20minutes at 160 degrees.

For the Cream Cheese Frosting:

Ingredients:

100gms Butter
200gms Icing Sugar
50gms Cream Cheese
Food color of your choice

Procedure:

·          Beat the butter in a bowl.
·          Add in the cream cheese.
·          Then add in the icing sugar.
·          Beat till stiff.
·          You can add the food color but I have kept it white color.
·          Pipe on the cooled cupcakes.
·          Decorate with sprinkles


Tuesday, January 29, 2013

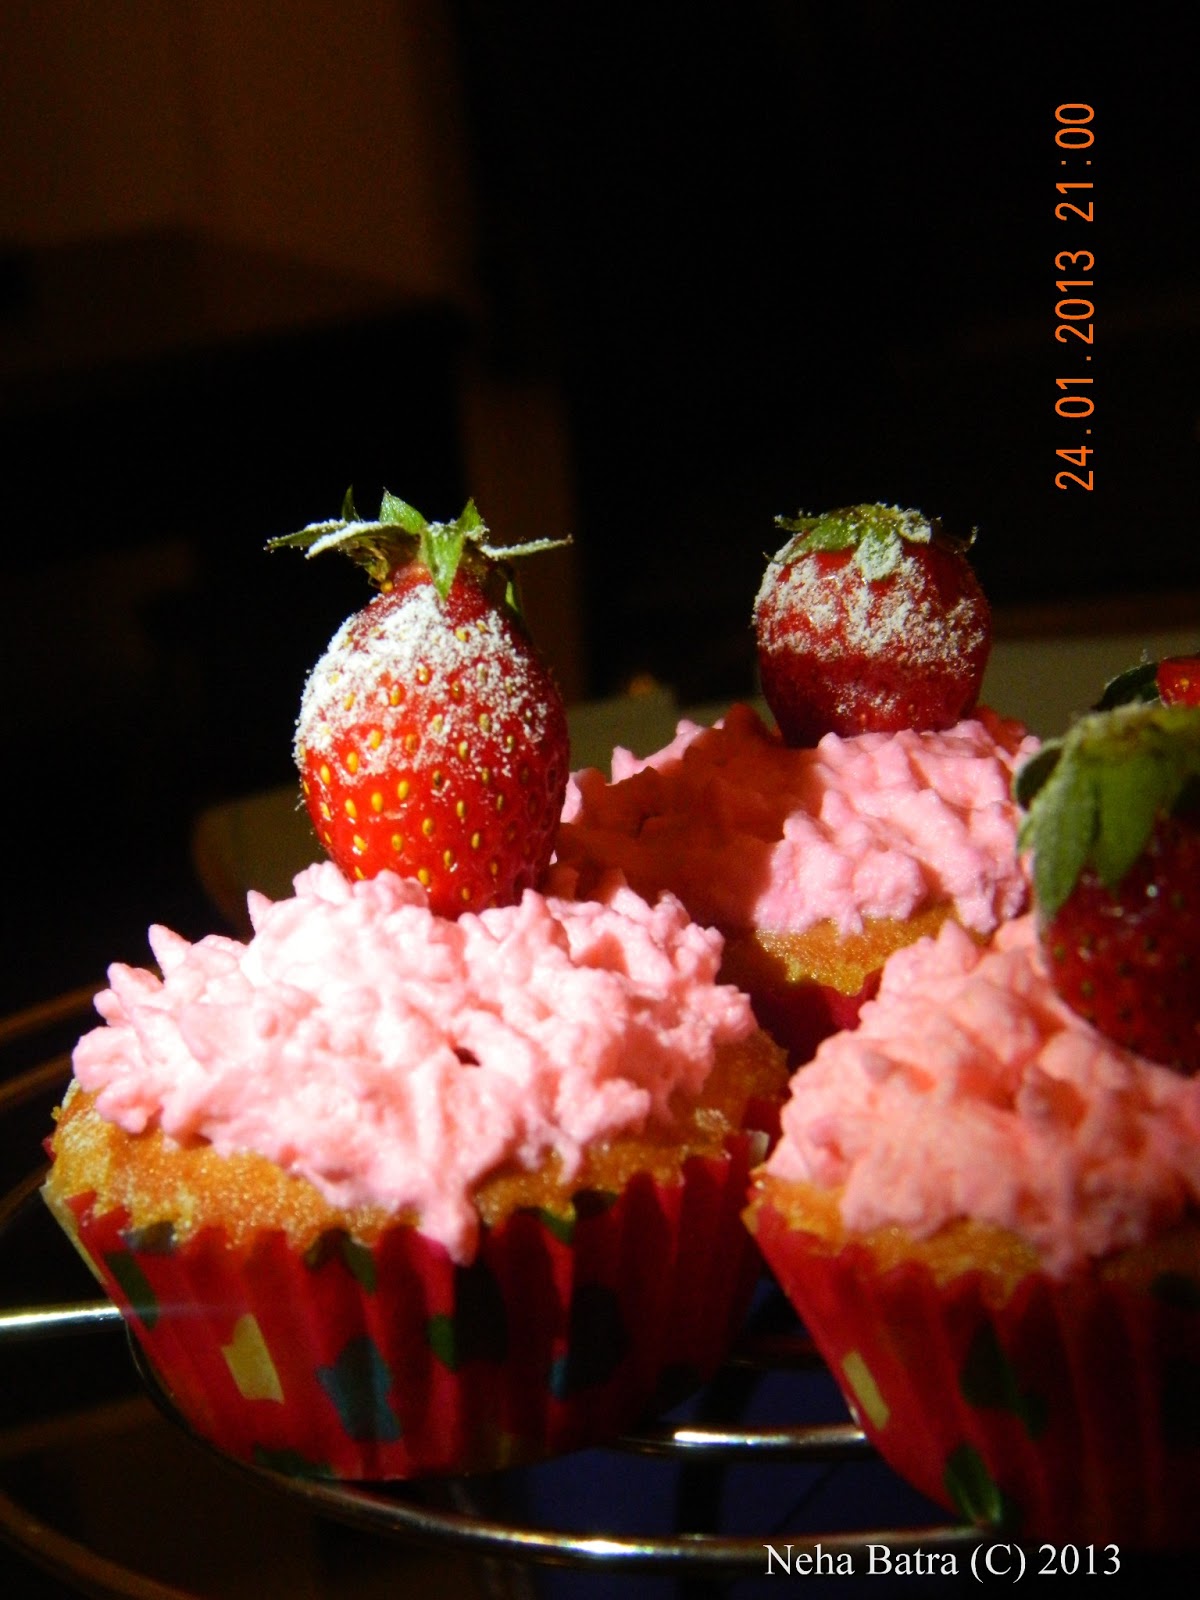
Vanilla Cupcakes with whipped cream and strawberries

Whenever I think of cupcakes I have this song going on in my  mind :
                                            "You're my Honeybunch, Sugarplum
Pumpy-umpy-umpkin, You're my Sweetie Pie
You're my Cuppycake, Gumdrop
Snoogums-Boogums, You're the Apple of my Eye
These tiny creatures makes me go weak in the knees, and whenever I see them in any cake shop I just want to have all of them that results in over-eating. Since a long time I wanted to make them at home, with proper knowledge of it, so i decided to take a class, I attended Palate Culinary Studio in Mumbai, to learn the art of making the cupcakes. 
It was a great experience and I learnt a lot.
I made them at home, and they came out just the way I wanted them to be.
Here is the recipe of Vanilla cupcakes. You can experiment it with different icings, but i chose whipped cream.
Hope u will enjoy reading them and making them too.

Vanilla Cupcakes with whipped cream & strawberries

Ingredients:
110gms Flour
110gms Castor Sugar
110gms Butter
1/4tsp Baking Powder
30ml Milk
2 Eggs
1tsp Vanilla Extract

Procedure:

  • ·         Pre-heat the oven at 180 degrees for 10 minutes.
  • ·         In a bowl, add the flour, baking powder and keep aside.
  • ·         Put the butter and sugar in a bowl.
  • ·         Cream with beater till light and pale.
  • ·         Add the eggs one at a time. Beat well.
  • ·         Add in vanilla extract.
  • ·         Gradually add in the flour, seeing that no lumps are formed.
  • ·         Add in milk.
  • ·         Mix it well.
  • ·         Do not over beat the batter.
  • ·         Pour the batter in greased and lined muffin tray.
  • ·         Bake for 15-20  minutes at 160 degrees.

For the Icing:

Ingredients:

250 ml whipping cream
Food color of your choice
1tbsp Icing Sugar
1tsp Vanilla Extract
7-8 Strawberries (small)s

Procedure:
  • ·         Take 250 ml of any whipping cream.
  • ·         Whip the cream with the help of a beater. Make sure the cream is cold.
  • ·         Add in color of ur choice, or u can leave it white also.
  • ·         Put it in the piping bag.
  • ·         Pipe it on the cup cakes.
  • ·         Take some small strawberries, place it on the iced cupcakes.
  • ·         Dust it with icing sugar

Thursday, June 28, 2012

Honey & Butterscotch Muffin


Its raining crazily here in Chennai... A cup of hot coffee accompanied with the purrrfect combination of honey & butterscotch makes it a magical evening.

Honey & Butterscotch Muffin


Ingredients:
250gms Self-raising flour

1tsp Baking Powder

1/2tsp Salt

125gms Butter (salted or unsalted)

175ml Milk

1tsp Vanilla Essence

2 Eggs

1cup Honey
1cup Butterscotch Chips


Tips:

ü  If using Salted Butter then don’t add in the salt in the batter.


ü  If self raising flour is not available, increase the quantity of baking powder to 3tsp.


Procedure:

·         Pre-heat the oven for 15 minutes at 180 degrees Celsius

·         Grease the muffin moulds with butter.

·         Place the muffin liners into the moulds.

·         Take two bowls, one for dry ingredients and the other for wet.

·         In one bowl, sift flour + baking powder.


·         In another bowl add in melted butter + milk + vanilla essence + eggs +honey.

·         Whip it all together for 5-8 minutes.

·         Now slowly add in the dry mixture into the wet folding it gently together.


·         With the help of an ice-cream scoop or a spatula fill in the moulds with the batter just 3/4th of the mould.

·         Place the moulds into the oven for 15minutes at 180 degrees Celsius.

·         Check them with the help of a tooth pick it it’s done.

·         If it’s done take it out from the oven.

·         Demould it after 5 minutes

        
Indulge!!!


Tuesday, June 26, 2012

Chocolate & Banana Muffin


A sumptuous Buffet laid out out for breakfast in a five star hotel and all that I lay my hands are on the varities of muffins kept.
The first thing that I always pick and relish and enjoy till the end.
So today I am posting one of the varieties a combination of Chocolate and Banana which are both healthy and tastes great too. 


Chocolate & Banana Muffin


Ingredients:

250gms Self-raising flour

50gms Brown Sugar

125gms Castor Sugar

1tsp Baking Powder

1/2tsp Salt

125gms Butter (salted or unsalted)

175ml Milk

1tsp Vanilla Essence

2 Eggs

2 Ripe Bananas

100gms Chocolate Chips


Tips:


ü  If using Salted Butter then don’t add in the salt in the batter.


ü  You can add only castor sugar in the batter which means 175 gms of castor sugar.

ü  If self raising flour is not available, increase the quantity of baking powder to 3tsp.


Procedure:


·         Pre-heat the oven for 15 minutes at 180 degrees Celsius

·         Grease the muffin moulds with butter.

·         Place the muffin liners into the moulds.

·         Mash the bananas with the help of a fork.

·         Take two bowls, one for dry ingredients and the other for wet.

·         In one bowl, sift flour + baking powder.

·         Add in Sugar. Mix well.

·         In another bowl add in melted butter + milk + vanilla essence + eggs.

·         Whip it all together for 5-8 minutes.

·         Now slowly add in the dry mixture into the wet folding it gently together. 

·         Add in the mashed bananas and chocolate chip into the batter.

·         With the help of an ice-cream scoop or a spatula fill in the moulds with the batter just 3/4th of the mould.

·         Place the moulds into the oven for 15minutes at 180 degrees Celsius.

·         Check them with the help of a tooth pick it it’s done.

·         If it’s done take it out from the oven.

·         Demould it after 5 minutes.

·         Serve.